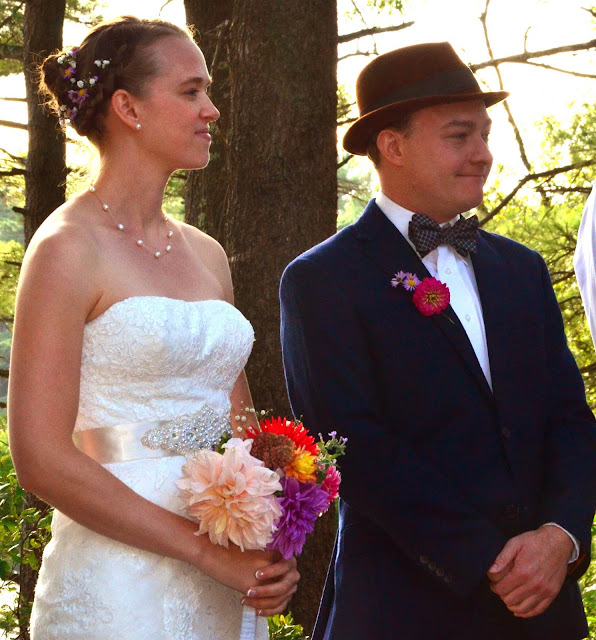
Showing posts with label wedding flowers. Show all posts

Monday, October 19, 2015

DIY Wedding Flowers for Rouwenna and Craig

Rouwenna and Craig
Every time I look at this photo I just get giddy! What a joy it was to provide flowers for Rouwenna and Craig's DIY wedding. I had the pleasure of meeting the bride when she visited the farm to discuss her wedding and flowers with me. I love having people out to see where their flowers are tended and loved prior to the wedding day.

Rouwenna  (such a pretty name) was kind enough to send me some photos of the flowers in action to share with you so here goes!
Dandelion House Flowers
 Rouwenna and Craig put together such a beautiful and personal celebration for their late September wedding day starting with the venue. Not far from Plymouth center is Pinewood Lodge Campground and Events Center, ( a family owned and operated campground  tucked into the woods overlooking a scenic pond with a lodge, outdoor events center, tent and trailer sites, cabins, cottages and yurts for rent).  Family from both sides of the isle came from far and wide to " camp out " at the Pinewood Lodge for a few days prior to the wedding.  

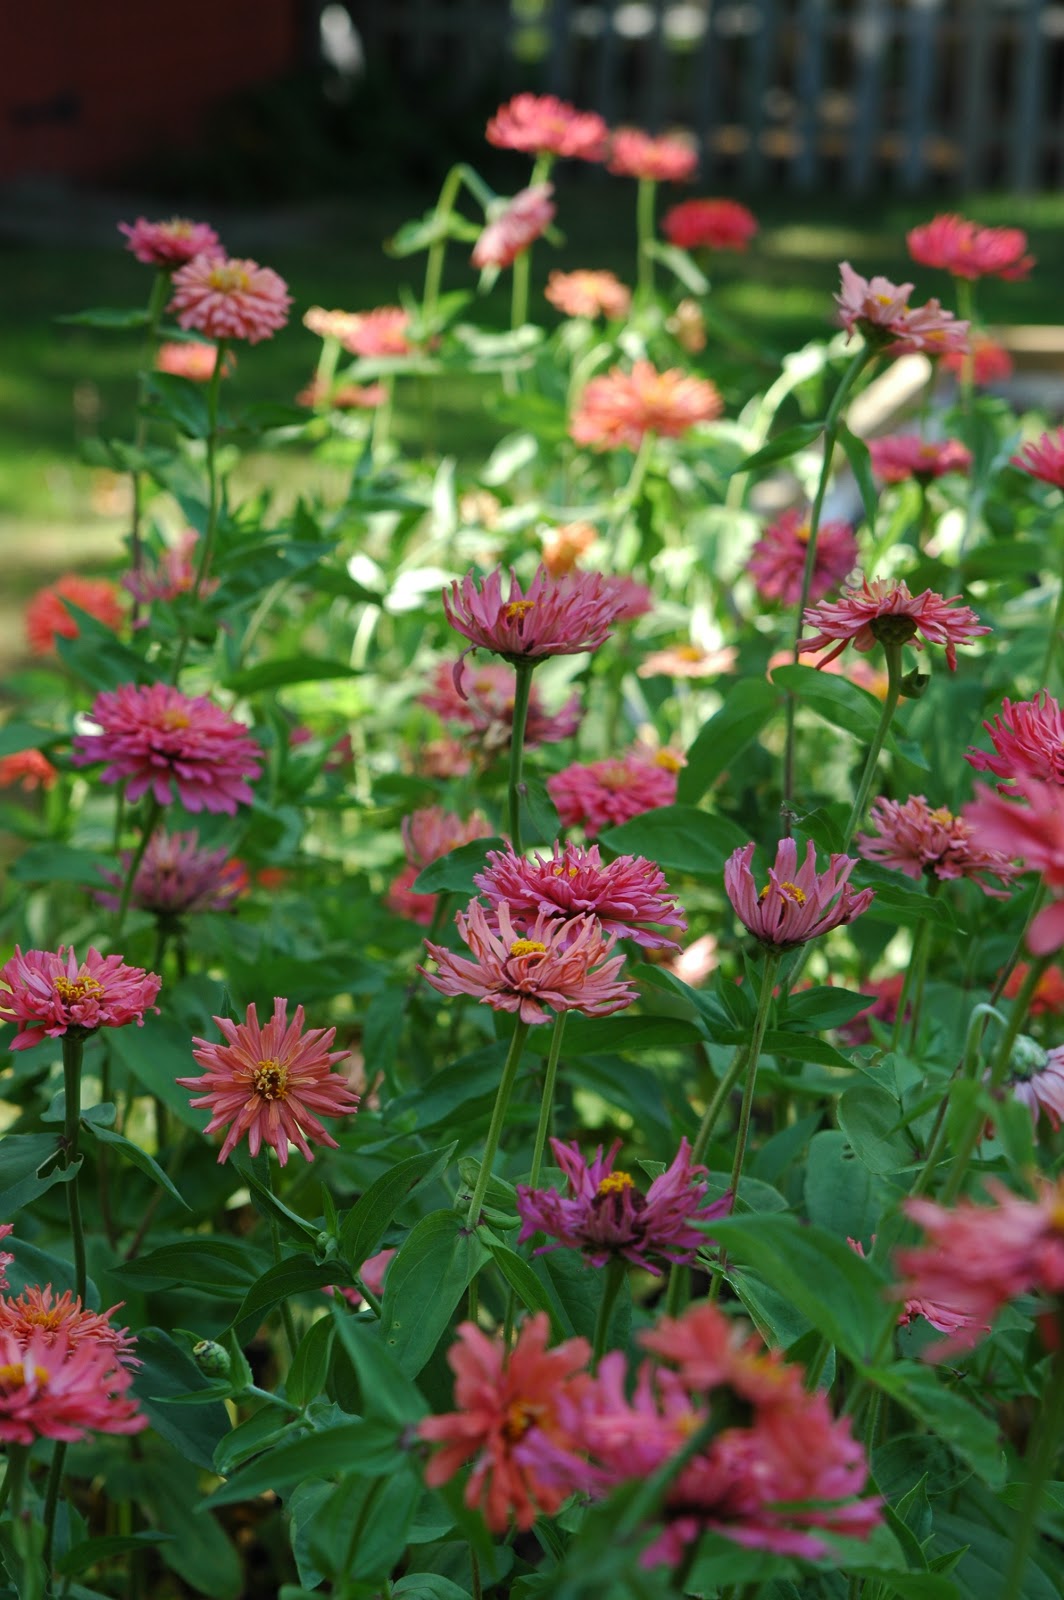
I loved this brides can-do spirit. She took a personal and practical approach with every detail. She knew exactly  what she wanted and stuck to her budget. I admire that! One of the things she wanted was tiny purple flowers and some baby's breath for her hair. Luckily my perennial asters were in  bloom the week of her wedding and the lilac color matched her flower-girls dresses to a tee!


Family and friends gathered the night before the wedding for the rehearsal dinner and some DIY flower arranging for the following day!

The bride getting some help with her bouquet.
 
She went with the ever popular mason jar for vases with fit the bill for her rustic venue. The colors of the flowers popped against the backdrop of the bridesmaids navy blue dresses. 

The bride and groom with the ladies of the wedding party.


 Mr. and Mrs. 


What I learned:
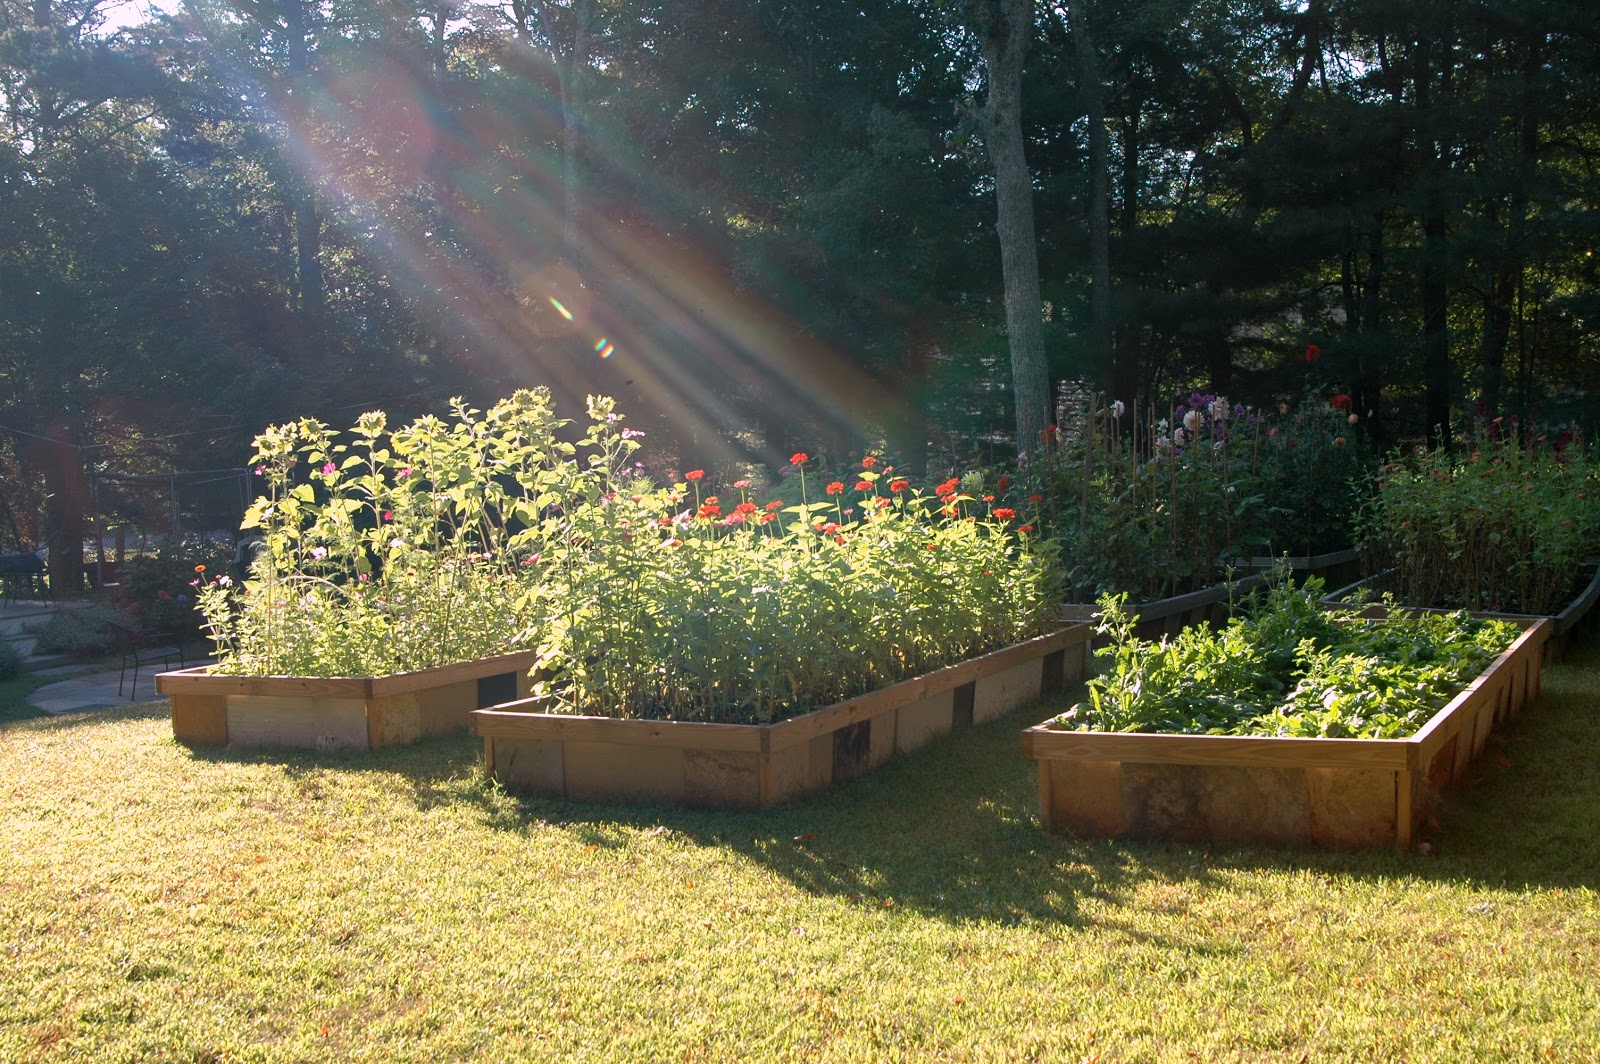
  •  On the "farm" side of things the dahlia patch suffered a spider-mite epidemic in mid-August that nearly wiped out one entire raised bed. I just barely made it for being able to provide enough flowers for what the bride ordered. I had to source additional flowers from a nearby local flower farmer. She was in the same boat as I was, scurrying to finish her wedding season also but the added blooms helped! I'll be planting 6, 4x12 beds of dahlias instead of three next year.
  • Listen, listen, listen...to your bride! Don't push unnecessary flowers and drive up costs. DIY brides are DIY brides for a reason. They are on limited budgets but also very creative and are keen on putting a personal touch on their wedding. I respect that being a DIY'r too.  
  • Provide some flower arranging tips for your DIY brides. Print out a small list of how to care for the flowers, and some flower arranging tips.
  • Be confident you can deliver what you promised. The day Rouwenna visited my flower farm I had just done a big cutting for a previous wedding. My established beds were a bit bare and my second crop was just starting to form buds. If I was her, I might not have committed but she believed, because I believed.
  • Be flexible and enjoy the little surprises and surpluses along the way. It's all good when you are surrounded by beautiful flowers every day.
 Oddly enough, I didn't seek out wedding work this summer. Local couples searching for local flowers found me through the farmers market and an add I placed in a local Edible South Shore magazine. I was pleasantly surprised by the interest and decided to go for it. I'm not gonna lie, I was nervous about the flowers being " on time " but I welcomed the challenge and new experience. Turns out, I loved it and I can't wait for next year!

So, if you're wondering if you can turn your backyard garden hobby into a small business the answer is absolutely, positively YES! 

Monday, September 28, 2015

Garden Notes: September Snips and Second Flourishes

Mini blooms designed by my girl ( Nicolette)
Hello Blog. Hello Friends. I've missed you! I don't think I've ever gone 20 days without posting. EVER! I think it's high time we get reacquainted, don't you? I confess, I've been posting on Instagram quite a bit and keeping up with my freelance writing work but my Dandelion House writings have been piling up along with the garden waste. Where to begin?

  
What an amazing season we had. In a span of about ten weeks our little backyard flower farm put out enough flowers for three local weddings, two farmers markets, and plenty of household blooms to enjoy. Adding 5 additional raised beds to our existing 8 made all the difference. Planting seeds at intervals of every two weeks in the new beds allowed us to have more flowers longer. I'll plan things even more efficiently next season.

Cosmos
We had very little rain this season which caused the larger perennial beds to crisp up earlier than normal. Even so, the grass plumes are feathered out and look so pretty in the autumn breeze.

Zinnias and Grass
The dahlias suffered from spider mites which stunted the growth for a few weeks in August. Talk about nerve racking! It was right in the middle of wedding season when I needed them to perform the most. I had to perform an emergency spider-ectomy with Neem spray. Complete removal of several plants was also necessary. I got to them a little too late and they just couldn't be saved.

Second Flourish
They finally perked up with new foliage and fresh blossoms just in time for the last two weddings of the season. My last two brides were DIY brides. I'm still waiting on photos. I can't wait to see what they created with their flowers.

I got to experiment with making flower crowns too! I made one out of silk flowers for one bride so it would be a keepsake for her. I'm anxious to make some with fresh flowers too. I have some lovely mixed pin cushion flowers and purple asters about to bloom which will be fun to create with. I didn't know how I would feel doing wedding work but it turns out I LOVE it. Collaborating with couples   about flowers for their big day is exciting and makes me feel all warm and fuzzy inside.

" Having couples out to the farm to see where their flowers will come from and the looks of awe and surprise on their faces when they saw the flowers was validating and inspiring. "

A mix of cultivated and foraged flowers,herbs and berries.
 Of course I made bouquets while we were at the cottage too! I didn't plant anything there this year but I scavenged some volunteer cosmos, mint, goldenrod, quince berries, grape leaves and weed with pretty small white flowers  I don't know the name of.
Cosmos

My daughter scavenged the garden yesterday and came up with this pretty little late September number.

All in all its been such a satisfying and rewarding season on the farm!
 What I've loved the most is doing my part to raise awareness about the slow flower movement and bringing fresh local sustainably grown flowers back home to American soil and America's tables. 


Tuesday, August 18, 2015

Garden Notes~ South- Eastern Massachusettes Succession Planting Tricks And Trials for Cut Flowers

Raised beds planted in Mid-March - late May
 We're having a heat wave this week with temps in the high 80's so I'll be hiding out inside most of the day until I can get back out to the garden this evening . 

I want to talk about my experience with succession planting today. With 13 4 x12 raised beds I was able to experiment planting seeds and dahlia tubers at different intervals this season with a goal in mind of having enough cut flowers in one season to sell at the Farmers Market and provide flowers for one or two local weddings. 

 So far so good! Two farmers markets down and one wedding to go! 
Until the season is actually finished I won't have a true sense of how my plans worked out but I can tell you how it's going so far.

 Here in Eastern Massachusetts we have a fairly long growing season which goes from Mid-March - November. This is pure gardeners heaven for someone who cut her gardening teeth in the clay packed earth of the high desert of Northern Nevada. If you've ever planted a tree in a hole you dug with an auger ( auger is slang for small jack hammer ) you know my joy!

Our last frost date is Mid-March and the first is somewhere in late October/early November. 
Here are my plantings and planting dates for the 2015 growing season.

 Mid-March- late May Plantings: dahlia tubers, and gladiolus corms

Dahlias


Mid-May Plantings: Bakers Creek Rare Seeds ( sown direct )
  zinnias, cosmos, cockscomb, sunflowers,  
Mid-May 
 Snapdragon and  dusty miller annual packs purchased at my local nursery.

These plantings filled 8 of my 4 x 12 raised beds and have provided all of the flowers for my floral work this season. Thus far I've created 70 32 oz mason jar bouquets from the first planting.

Cockcomb
This is my first time growing Cockscomb and it us such a fun plant to grow. The flower head just keeps changing and getting bigger every day. I've been using them in my arrangements in the early stages of blooming and they're perfect for added pops of bright color and interesting texture.

Cockscomb and Senorita Pink Zinnia in the rear bed. 


Sunflowers and cosmos
We didn't finish construction on the other 5 raised beds until early July. I had hoped for a late June second planting, but went ahead with the early July because I wanted to see how long it would take for those seeds to germinate and flower.

Senorita pink zinnia
5 rows of zinnia seeds in a 4 x 12 raised bed
The second planting of zinnias ( last weeks photos ) is coming along and have grown  even more since these photos were taken and the plants have formed buds! It's looking like I'll have flowers for September as long as the weather cooperates. Living near the coast we are subject to coastal storms and high winds so keep your fingers crossed we don't have any of those until after my last wedding on September 26th. I'm learning the realities that farmers have been dealing with for centuries. We can't control the weather but I'm willing to gamble!

This patch of zinnias are all reds and oranges. Perfect for fall flower arranging!

Farmers Market Bouquet 
My grab n go mason jar bouquets have been a hit at the Farmers Market this season. People really like having something table ready and they make great gifts too.


Saturday, August 15, 2015

Mason Jar Wedding Centerpieces With MY Local Flowers


Dear friends,  
I feel as if it's been forever since I sat down to say howdy. Life as a mom and writer is busy enough. Toss flower farming into the mix and now we're talking B.U.S.Y. but it's a beautiful busy and I love every minute of it!
We've ( my daughter and I ) been peddling our petals at the local Farmers Market and we just delivered our first wedding order yesterday! 


Today I'm sharing the wedding centerpieces I made for the bride and groom's farm venue wedding.The bride chose a modern/rustic theme for her mason jar centerpieces and wanted to incorporate locally grown flowers into her wedding so we were a perfect fit!
 I love doing arrangements in mason jars because they are so versatile and most flowers look happy in them.
My bride provided the jars and the ribbon and I did the decorating. It only took about an hour to cut the ribbon to size, glue it on and tie on the twine bow at the last. I simply measured the ribbon to fit the center of the jars then cut it to allow a half inch over lap, just enough to add a few drops of Quick Dry Fabric Fusion. This stuff is amazing!!!! It works like a charm. It's truly fast drying and fabulous on fabric.
Once the ribbons were secured on the jars I cut lengths of twine 27 inches long to tie around the center bows. 


 FYI. I found it easier to adorn the jars before adding the flowers. Makes sense doesn't it? Especially if you are doing any gluing or you have to lay the jar down for applying ribbons, beads, burlap, lace, etc.


I always cut flowers early ( before 8:00 am ) before the sun has a chance to start warming them up and place them immediately into clean buckets of fresh water.

Cut flowers for the centerpieces.
I used a mix of seasonal flowers for the centerpieces. All of them came from my backyard except some golden rod still in the bud stage that I foraged from the backyard at our cottage. Thank goodness I did, because I'm low on filler material this year and the wispy stems of the golden rod added just the touch of rustic romance I needed for the finishing touch on the centerpieces.

Cockscomb ( red)
Cafe Au Lait ( dahlia)

I have to say, I think the black and white ribbon is striking with all of the flowers. 
Once the centerpieces were finished I packed them into sturdy cardboard boxes and my daughter and I packed them into the back seat of her Vintage Ford 250 Truck and hit the road. I was calm as a cucumber after the delivery but I woke up very early this morning with butterflies in my stomach worrying about the flowers. Were they too squished in the box? Did any of them wilt in the night? Probably not.They withstand much more abuse sitting in the sun all day at the farmers market and they were only in the truck (not air conditioned ) for an hour before going to an air-conditioned house. Still, I worried but a Facebook comment from my bride this morning settled my nerves. They are fine and right about now they are probably sitting pretty atop her tables at her venue. They've promised to send me photos from the wedding photographer! I promise to share them with you as soon as I get them!


I've been a gardener for 25 years but flower farming takes it to a whole nuther level. I've always dreamed of having a farm...Who knew I would find one in my own backyard?
 

Tuesday, October 21, 2014

Fall Flower Arrangment~ Go Native and Natural

  As the temps continue to drop my perennials and shrubs fall deeper and deeper into the rich shades of autumn. The colors and textures may change but they are still beautiful and provide plenty of inspiration for floral arranging!

Today I'm sharing a fun recipe for making a quick and easy seasonal arrangement that is suitable for a basket, bucket, vase ( CHICKEN COOP ) or even a fresh fall garden wedding bouquet.
I've been needing to freshen the container that hangs on our hen house for a while now. 

The flowers in the container below have been hanging on the chicken coop all summer long. They  have become quite faded, plus the bright yellow and blue hues don't represent the rich earthy tones we love a bout fall! So  I tossed them out and got busy cutting some faded  autumn blooms from my garden.


It's fun to walk around the garden this time of year and look up close at the plants as they begin the final descend into dormancy. It allows one chance to give thanks for the bounty the garden has provided and the nurturing and teaching it has offered throughout the flourishing months of spring and summer. The fall garden is still a living, giving thing of beauty! 
 I cut a small branch off of my Oak Leaf Hydrangea which is just beginning to take on deeper shades of pink, red and burgundy. I built my arrangement around this branch.

Next I cut a large Hydrangea blossom off of my Bridal White shrub.

The edges of  the petals look as if they've been dipped in lavender. To think that they were still a brilliant white with hints of lime green just a few weeks ago. 


I also gathered some nine bark for the rich almost chocolate brownish red color, another variety of hydrangea with petals that have already faded to a vintage sepia tone, and some autumn sedum joy for its plum tones and large, nubby flower head.
 I tucked in a few ornamental grass plumes just for fun! 

Here's what it looked like when I brought it over to my potting bench. As I walked the garden I looked for variations in the leaves, blower heads and textures of the over all plant selecting some for the most color variation and others for the least. Does that make sense? If not, just walk around and cut some of your faded flowers. Hold them in your hand until you like what you see and feel you have enough to fill your vessels. There, that's the easy way to creating a natural fall bouquet!
 It's not rocket science, it's playing with flowers... Easy!

  I can just imagine all of these colors wrapped in burlap then tied with a brilliant gold or brown satin ribbon as a fall wedding bouquet.

You'll want to add some water to your vase before you add the cuttings. The water will keep your foliage fresher longer. Put the vase in your container ( with water ) and start to add your cuttings. 


I  put the largest branch in first, then the large hydrangea blossom. I free-styled it from there!

Here's what it looked like when I brought it over to my potting table. I can just imagine all of these colors wrapped in burlap then tied with a brilliant gold or brown satin ribbon as a fall wedding bouquet. I hear  herbs, grasses and garden foliage are trending" for wedding flowers in 2015!

Since no one is getting married here, I hung the container back on the hen house... The cottage hens were so happy! I even heard them talking about wedding dresses and venues as I walked away... Those silly girls!

Related Posts Plugin for WordPress, Blogger...