Showing posts with label RE-Purposed Furniture. Show all posts

Monday, October 10, 2011

Home is Where you Hang your Hat


Any old place I can hang my hat is home sweet home to me ~
William Jerome

What happens when you marry an antique door with an end table from the Salvation Army?


It becomes a Hall Tree! At least that's what happened with ours. What is it about old things that we love so much? Is it the stories or imagined mysteries behind them or do we really just love the smell of dust? For me, it's all of the above! 


Come see how these " pieces of the past " came together to create a whimsical, one of a kind Hall Tree that sits in our dining room...
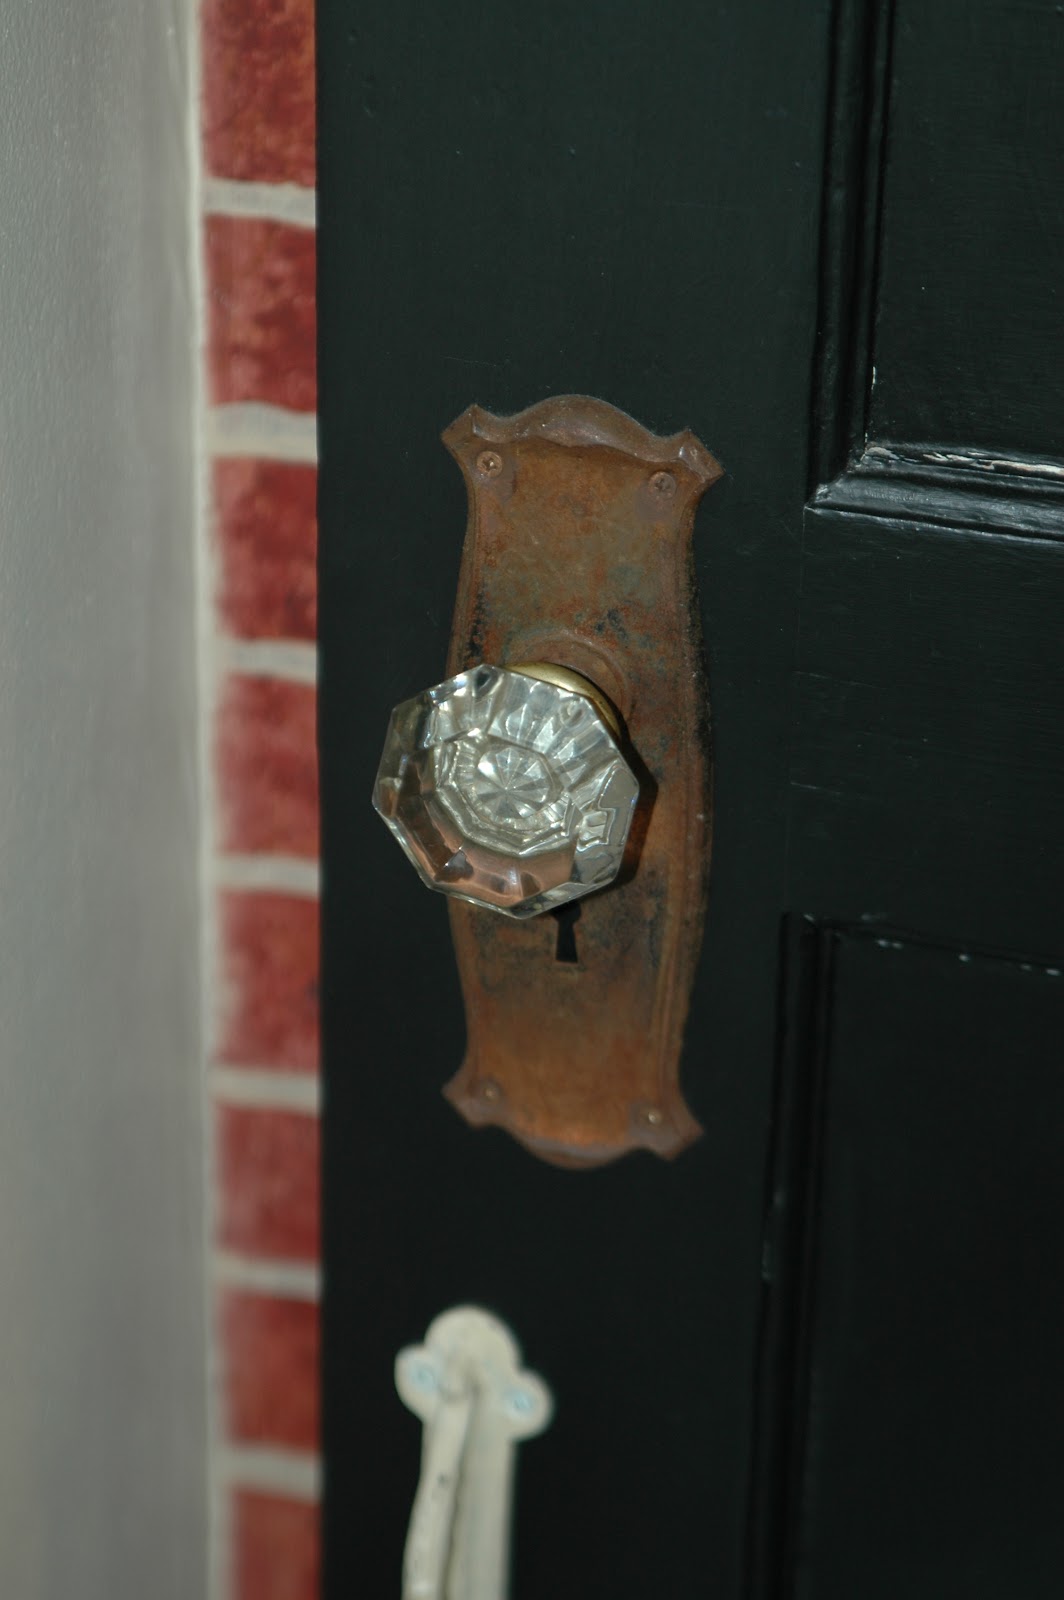

The thrill is in the hunt for a piece like this. We scoured thrift shops and architectural salvage places  for the door handle. The end table ( which became the seat ) cost 10.00. We loved the chunky legs and curvy apron front on this little side table. It was perfect for this homemade Hall Tree! My mom did all the painting and my husband put it together. The brackets are reproductions but the door handle and door plate are antique!


The ornate brackets were found at a local discount unfinished furniture outlet in our town called Mill Stores.


Well, go ahead and hang your hat! I've left it bare for you today! It's usually covered with the dog leash, a rain coat and a hat or two.

Have you tried a project like this? I'd love to hear about it!
Happy Creative Recycling!

Linking to more creative bloggers today!  Savvy Southern Style Wow us Wednesday, Three Mango Seeds, Motivational Monday and Time Travel Thursdays with Branbleberry Cottage!

Thursday, March 24, 2011

Antique Letter Desk ~ say what?


" Please write again soon. Though my own life is filled with activity, letters encourage momentary escape into others lives and I come back to my own with greater contentment."-Elizabeth Forsythe Hailey

There's nothing quite like the warmth of a handwritten letter or note in a hand~made card or one selected just for you. ( I hand painted this card using a stencil, red craft paint and a gold leaf pen).

With today's fast way of communicating via the Internet you might wonder why anyone would even consider having such a thing as an Antique Letter Desk around the house. Even though much of our daily communications happen as fast as a satellite signal can transport them, I believe there is still a need for the hand written letter or note inside a lovely card don't you?

During one of our flea market trips my mom came across a wonderful Antique Letter Desk and she just had to have it! It was probably constructed in the mid 1800's to early 1900's. In it's prior life, it was stained a dark walnut and was without any additional embellishments or decorations on it.
That was then....

She gave it a good priming then painted the desk with a top coat of soft green latex paint in and eggshell finish. The stenciled words on the outside of the lid declare this piece a modern day Letter Desk.


Today, it looks nothing like it did when she brought it home!

She worked her magic and brought this old time, out dated workhorse back to life. She added such charming details as wooden ball feet and a hobnail detail across the bottom of the desk and decorated the inside of the desk with cheery RED fabric for a touch or warmth and romance.


If that wasn't enough, she created a memo board on the inside of the lid for holding special cards, notes or photos.


It even has a handy place to store pretty boxes of cards or luxurious writing paper!

Maybe you'll be inspired to put your pen to paper a little more often.
Give it a try, you'll just feel better, I promise!


Wednesday, March 23, 2011

Fool the eye FAUX headboards


Today I'm sharing a fun, budget friendly way to decorate your bedrooms with some hand painted whimsy!


These fool the eye hand painted headboards were a temporary fix for rooms I knew we would be changing as our daughter grew up and the need for a den/school/music room  finally over ruled the guest room! Both headboards are painted in a loose free hand style. I used a real bed post to outline the posts ( with a pencil ) on the red bed above. I used acrylic craft paint in red and antique gold for the accents and " pretend shadowing ".
When my mother came to visit, she said she used to try and grab the rails to help her out of bed, but there was nothing to grab on to!


I was inspired by a children's book illustration for the shape and size of this headboard. I used the colors and patterns from our daughters quilt for the designs.

* These two headboards cost under 15.00 to create. The only thing I had to purchase was craft paint and a few new brushes! 

I'm linking up to Whassup Wedneday with Elements Interiors and Wow us Wednesday over at Southern Savvy Style!

Tuesday, March 8, 2011

Once a Cheetah always a Cheetah ~ a bench GONE WILD


You know what they say about a leopard never changing its spots? 


( photo from Mill Stores of New England )
The above photo is a " pretend" before image of a similar bench I bought at a local flea market for 20.00. 

 With the help of  the Royal Design Studio Small Wonders stencil collection I gave it a completely new identity! These stencils come small so you can easily fit them onto small surfaces allowing you to create amazing designs on furniture, signs, mailboxes, walls and more. 


I created a faux Zebra Seat with a bold purple border just for fun!


Go ahead, try it out!  


I thought we could use a little WILD today! 
Enjoy and Happy RE-PURPOSING! 

Gone wild lately? Try it! 
You'll just feel better! I promise!
Deborah Jean 


This post is linked to Miss Mustard Seeds Furniture Feature Friday and Transformation Thursday at the Shabby Chic Cottage! 

* This piece was painted in a neutral latex base coat then sanded lightly. All decorative paint is acrylic craft paint from Michaels Craft Store. It has been sealed with three coats of water based varnish for added protection and to bring out the painted design. 

here

Tuesday, October 19, 2010

LET THERE BE LIGHT

Do you have a dark hallway or a room that gets very little daylight in your home? We did! Consider removing a solid door and adding a French door in its place! We did just that in this easy  trash to treasure project. 


* when your paint is dry and before hanging the door use a small craft knife to remove the protective paper on the glass panes and any remaining paint. Do this OUTSIDE!  It will be easier to clean up all those small paper strips and pieces. 

Our Den was dark and needed more light so we decided to lighten things up by purchasing a new/old French door at a Contractor’s Supply Warehouse. New French doors can sell for 200 – 300 hundred dollars. This one cost 75.00 and with a little elbow grease and some spray-paint we had a new door and a view into our den that goes straight through to the outside. Not only does this door add the light we were sadly missing into the den but it makes the hallway lighter and brighter too! Now we can see and hear our young composer while she plays the piano. 


It’s not an antique. It was most likely rejected by the contractor or homeowner.  It came primed so all I had to do was sand and paint it to match the trim in the rest of our home!


 To add some vintage charm to our home I am up cycling all of our out- dated brass door knobs to my new favorite paint finish for metal. Oiled Rubbed Bronze. I was inspired to try this painting technique after seeing Michelle Rayburn's amazing chandelier makeover on her blog 
Trash To Treasure.   This door knob was my guinea pig! I love the results!


  I used Rust-o-leum primer and paint for the door knob.And a satin latex for the door in Ralph Lauren’s Sail White to match the rest of the interior paint trim in our home.  * spray painting door knobs or cabinet knobs can be tricky because they don't lie flat. I used a box from the bakery to hold these door knobs upright while painting. Let them dry right in place until you install them. A shoe box would work well too. 


New Oil Rubbed Bronze finish with a touch of sparkle! 

* New door knobs in this finish can cost between 20- 30 dollars plus 7.00 or more for a package of three matching hinges x how ever many doors you have. For a few cans of spray paint at roughly 4.00 a can you can save- save -save!   


Tip: Before you purchase a  new/old door for your home be sure to measure the height and width as well as the width of the door for the new one to make sure it will fit and that any alterations needed are reasonable for the project! Measure the opening top to bottom too. We had to adjust the hinge placement slightly but that was all.

To find your new/old French door see if you can locate a Contractors Warehouse or Re-modelers Outlet  in your area.
I hope you liked this creative recycling project!

Thanks for stopping by the Dandelion Workshop today!  
Deborah Jean 


I was TICKLED PINK with this project so I linked up with Holly at 504 Main and other tickled pink bloggers to share the fun! 


Saturday, September 25, 2010

Happy GLORIOUS Autumn


It's Autumn! My absolute favorite season of the year... While I do love spring and summer, Autumn is MY season! I have an annual love affair with fall every year.


 The bright and  brilliant earth colors of fall energize me and feed my soul giving me a new appreciation for all the natural beauty of the season. Spring has it's own sense of awe inspiring wonders, and I relish the BEACH life in summer. But fall, to me anyway, is the grand finale! 


   I couldn't wait to put on my farmgirl hat and head outside to my little farm in the yard.
Come see how we have welcomed fall this year!

Friday, June 4, 2010

Magazine Rack RE-DO~


The COLOR inspiration for this little " planter project " came from, of all places, my egg collection bucket!


Friday, May 21, 2010

Second Hand Roses~


These " painted ladies" were gathered at different yard sales, flea markets and the local dump! It was a very satisfying trash to treasure hunting day. I came home with money in my purse, a darling little desk with french curved legs and original white iron drawer pulls which I kept! A tired old luggage rack with scratched wood and torn strapping. A vintage mirror, a porcelain rose lamp base, and a beat up cornice from a window treatment that was long gone...Come see how these "ladies in waiting" turned out!

Tuesday, May 11, 2010

something old ~ SOMETHING BLUE

 A little table just for you!

 Cottage Style


 I'm talking about THIS table that my hubby built out of an old worn out oar, a hockey stick and some pine slats.


The inspiration for this little " cottage table" came from another  table that used to be in our cottage... We borrowed the size and shape of it to create this table. The top is made of pine slats and painted with acrylic COBALT BLUE paint! I love the warm patina on the oar don't you? You can't see it but the frame of this little table was built from a reclaimed hockey stick...


Don't let a small space limit your decorating fun! You can still make room to place the occasional book, candle, or sketch pad. Just think SMALL!


Keep your eyes open for ways YOU can re-purpose found items and have fun creating your own Born Again Creation's!

You'll just feel better, I promise!
Deborah Jean

Visit  my Creative Recycling Blog Challenge  page to see more IMAGINATIVE projects!

HAPPY CREATIVE RECYCLING !


Monday, May 3, 2010

Pretty in Pink~ cherished china


I've always been a bit old fashioned at heart. From the time I was a young girl I have been in love with anything old. Old towns, old houses, old furniture, old gardens and old ways too. I know I'm not alone in my ability to romanticize the past and I love to bring the yesterdays we romantics long for back into the here and now through the art of creative recycling.
  

Tuesday, April 20, 2010

Old Shutter~NEW SHUTTER


What would you do with an old shutter destined for the trash heap?

 WAIT! You can do something with that !

  Cottage Style!

The eating area area in our cottage is tiny... cozy for 4 and not one more  tiny, but it's charming with three large windows that let the morning sun pour in during breakfast! I like using large pieces of art and furniture in small spaces when I decorate. To my eye, they make more of an impact than several small things hung together. That's just me!

THE PROJECT:  The green shutter was used to cover the windows for protection from storms during the off season.
 When I saw the shutter my artistic side wanted to find a new way to use it and my sentimental side just couldn't part with it! So........after a bit of daydreaming, I came up with the idea that we could place a small mirror that " looked like a window" and attach it to the shutter! Off I went to a local BIG BOX store to find an inexpensive mirror, then to the craft store for off white and green craft paint and some CRACKLE MEDIUM.

CRACKLE TIP: when using crackle, think about what color you want to see peaking through from underneath your top coat. It will depend on your project if you are going with a dark or lighter base coat.

I painted the base coat on the NEW mirror frame with green paint and let it dry, followed by the crackle medium, allowing for the correct drying time before applying the off white top coat. The green peaks through the white top coat from behind the crackle and makes it look as if the added mirror has always been a part of the shutter!  


           Splatters of old white paint tie in the old with the new.


       Now we have a " Piece " of  cottage past  ( and it's even painted GREEN ) adorning the wall and more sunlight bouncing around our cozy kitchen in the morning!


   This was an easy and fun GREEN project! 


What have you re-purposed lately?


This post is linked to Funky Junk Themed Linky Party!

Deborah Jean~


Related Posts Plugin for WordPress, Blogger...